Visual Studio integration
Table of content
To start developing apps using innovaphone SDK, we highly recommend to use Visual Studio 2017 or newer. While you can use what ever IDE or environment you want to use,
the benefit of using Visual Studio is our integration. The innovaphone SDK comes with a Visual Studio extension to integrate everything you need into the IDE. So managing
connections to the PBX or the App Platform itself will be handled by the extension. It also offers a template which can be used as an example or as basis for your own app.
If you haven't done yet, download Visual Studio from the Microsoft page. Depending on your company it could be, that you even can use the free Community Edition of Visual Studio.
Look at the Microsoft Visual Studio homepage for more information. It is important to select the Workload "Linux development with C++":

NOTE: Due a bug in some version of Visual Studio 2017, make sure to install at least version 15.9.6 or newer!
After installing Visual Studio, run the innovaphone SDK setup (or run it again if already done), to install the Visual Studio extension. If everything had been installed, you
are ready to go. The following guide shows you, how to setup the environment and start producing Apps. Please note that the following documentation is based on the usage for
Visual Studio 2017, but should be the same on newer version (more or less, depending on how much Microsoft has changed the UI).
The following parts will guide you step-by-step through the process from creating an app, setting up the connections needed and run your app to debug it. It is recommended
to read this document to understand how to use the innovaphone SDK and the Visual Studio integration.
Intellisense for Linux nmake projects is broken in VS2017 due to a buggy file of the installation. This bug is fixed in VS2019. If you're running VS2017, backup the following file and edit the original:
C:\Program Files (x86)\Microsoft Visual Studio\2017\Community\Common7\IDE\VC\VCTargets\Application Type\Linux\1.0\Linux.Makefile.targets (the installation directory may vary of course)
Search for <Target Name="_FixupRemoteIntelliSenseIncludes" and replace the inner ComputeHeaders tag with:
<ComputeHeaders
ProjectDir="$(ProjectDir)"
RemoteProjectDir="$(RemoteProjectDir)"
TargetLinuxPlatform="$(TargetLinuxPlatform)"
WiringPiIncludePath="$(wiringPiIncludePath)"
IncludePath="$(NMakeIncludeSearchPath)"
LinuxIncludePath="$(LinuxIncludePath)"
RemoteTargetId="$(ResolvedRemoteTargetId)"
Sources="@(ClCompile)">
<Output TaskParameter="CIntelliSenseIncludePath" PropertyName="CIntelliSenseIncludePath"/>
<Output TaskParameter="CppIntelliSenseIncludePath" PropertyName="CppIntelliSenseIncludePath"/>
</ComputeHeaders>
For development, you also need a PBX and App Platform to run / debug your application on (see the diagram in the chapter Assign a remote connection for an overview about how the service (your app), the PBX and the App Platform are connected to each other). This chapter describes how to prepare a real hardware (like IP811) for development. If you want to use the App Platform and PBX on a virtualization system, see the chapter below.
Before you start, make sure the IP811 is ready for install. To be sure, make a hard reset of the box by pressing the reset button (e. g. by using a pen). Wait until the green LED flashes rapidly. Release the reset button and wait, until the LED glows orange. Now disconnect the box from the energy and connect it again. You should now be ready to go through the install process.
At first you need to get the IP address of your hardware. If it is connected to the internet (which you need during the install process anyway), you can use https://config.innovaphone.com/ and enter the serial number of your PBX. If that doesn't work, you can use the MAC address printed on the bottom side of your hardware. In case of doubts, ask your system administrator for more information.
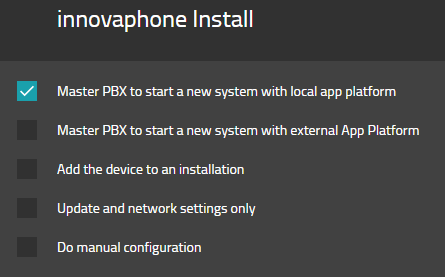
If you know the IP address, use a browser (chrome or firefoxis recommened) and open the page "https://pbx-ip-address/install.htm?stdpwd=on". This will start the install process for the PBX. The parameter "stdpwd=on" will set the default user and passwords, which makes access during development easier. The default user is "admin", the default password is the name of your hardware (for IP811, the password is ip811), all in lowercase. The first page you will see offers you a selection of how to setup the PBX. For a development PBX, select "Master PBX to start a new system with local app platform". Click on "Next" to get to the next page.
The next page is to set up the network settings:
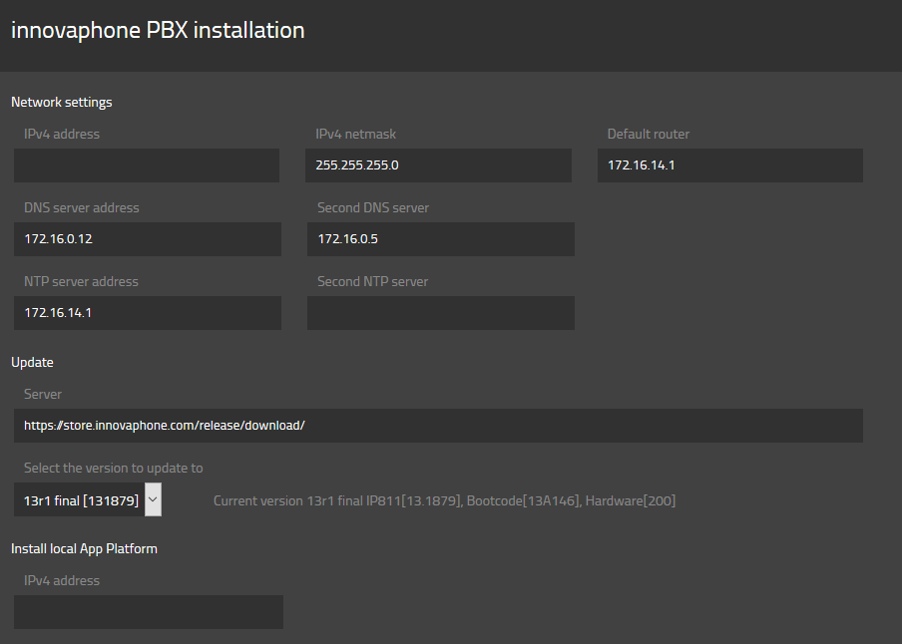
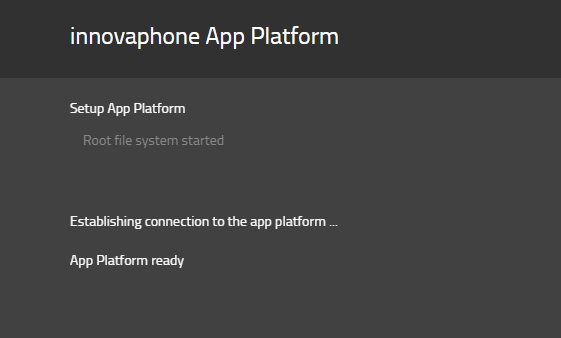
Just fill in the IP settings suitable for you network. This will be the IP address for the PBX. In the update section, let everything as it is. In the section "Install local App Platform", enter the IP address for your App Platform. When clicking on next, it can be that the PBX will install an update or reset itself to apply the IP settings. So after that, you will be back at the same page an click next again to proceed. The PBX will now download and install the App Platform. This can take a while, so please don't interrupt that step. After the App Platform is installed, you should see a screen similar like the one below. Again - click on next to continue.
Now you need to enter the details for the admin user of the app platform:

It is highly recommended to use an easy password for the admin user to make development easier. You are free to use whatever you want as domain name, but if something else than example.com will be entered, don't forget to change that value in the main file of your app, too (look for the line 'instanceArgs.appDomain = "example.com"' and replace the value there). If you won't do that, the PBX won't be able to connect to your app. This is only important for debugging your app. If the App Platform manager will start your it, he will set the domain like defined in it's settings and ignore the hard coded value.
The PBX location can be used in your code to identify the PBX for installations with more than one PBX running in a network. The Domain names should be empty and "User DNS to access myApps" deactivated (except you're know why you need to enabled it). Select a language for voicemail and click on "Next". The dialing prefixes settings can be ignored.
From now on, the last steps are straight forward. At first you will see the username and password for the PBX. Because you started it with the stdpwd=on option (as described above), that will be the default user and password as expected. Click on next for the email setting, where you only need to deactivate the option "Email account" and click on next. Then the base apps will be installed, which - again - can take a while. After all default apps had been installed, two pages follow where you have to install the PBX and App Platform certificates (just click on the buttons when shown).
The setup process is now completed. The only thing left is to enable the test mode and reboot the system:
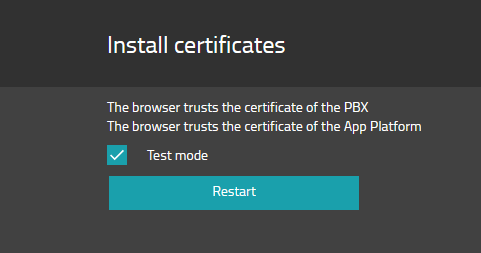
After reboot, you must login yourself with "admin" and "pwd" (if you used that username password in the above step) and you will find yourself on the myApps page for your development installation. You can now proceed to startup Visual Studio and create your own great apps for that gorgeous platform.
Instead of a real hardware PBX, you can also use a virtual machine for development. For this, you need to go to our AppStore and download the latest for the IPVA (under "Firmware") and App Platform x86_64 (under "App Platform") images. The downloaded zip files contain images for Hyper-V or VMWare. Please read the documentation of your virtual machine solution to learn how to install an existing VM. When installed, just start the VM for the IPVA and App Platform and wait, until they have booted. Note that the first time start for the App Platform can take a while. So please wait, until you see the Linux login prompt.
The install process will be nearly the same as described above, with some little exceptions:
- At the first page, select the first option ("Master PBX to start a new system with external App Platform")
- After the step where you need to setup the network configuration, you will see a page where the IP address of the App Platform must be entered. The password is the default password (pwd). With click auf "connect" you can test if everything is ok. Now click on next. (To get the IP address of the App Platform, login to your App Platform VM (username: admin, password ipapps) and type ifconfig).
The rest of the process is the same as described above.
After you start Visual Studio you should wait for the innovaphone SDK extension to be initialized. Visual Studio wants the extension to be loaded asynchronously
and there is no way to tell, that this extension need to be loaded before the user can open a project using the innovaphone SDK. But normaly it only takes a couple
of seconds. However, you can open a solution or create a new project before the extension has been initialized, but this will lead to a delayed initialization
of the extension and with that maybe some dialogs that will be displayed while you already start typing. And also some menu items will be disabled until initialization
is completed. So finally you need to wait, so it may be better to wait before opening an innovaphone SDK project.
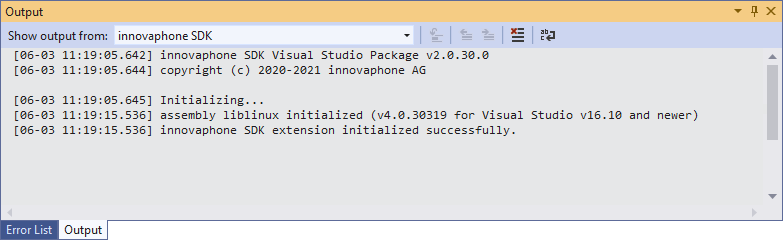
You can verify that the extension had been loaded by checking the output pane (View - Output - Show output from: innovaphone SDK).
This pane also is your place to go to get additional information on what is going on in an case of an error. Every message will be posted as a log message to the it.
After the extension had been initialized it should look like the screenshot below (the actual view depends on the Visual Sutdio version you're using):
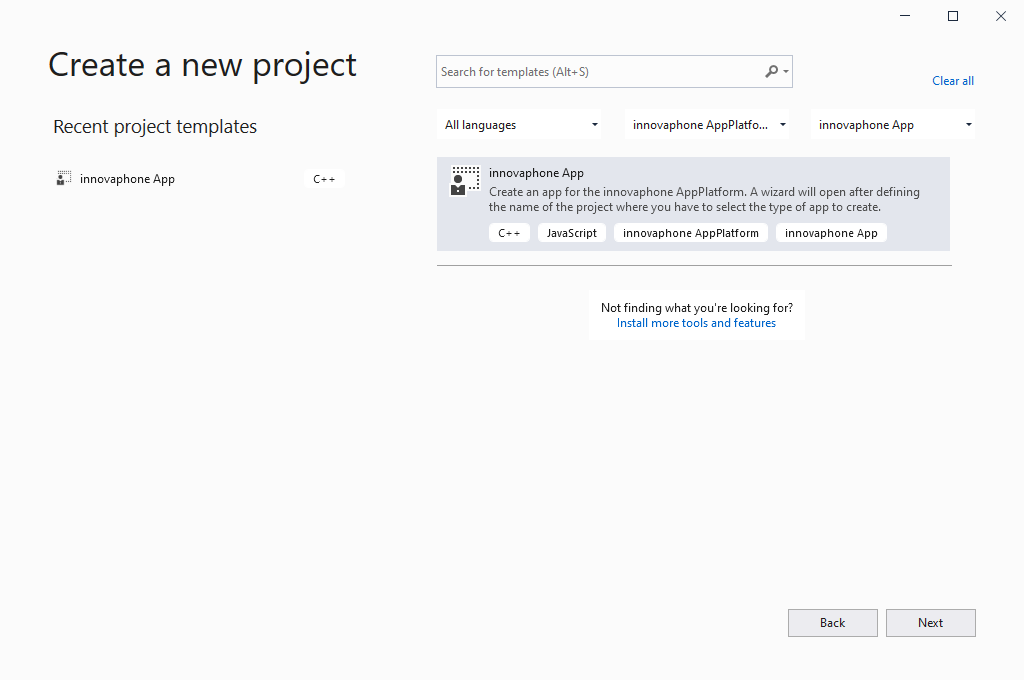
Now you're ready to start your first innovaphone SDK project. For this, create a new project (File - New - Project). There you must select the innovaphone App entry
and click on next. Give the name you want to use for your app and click on create. For the path, let create Visual Studio a directory for the solution (which will be enabled by default).
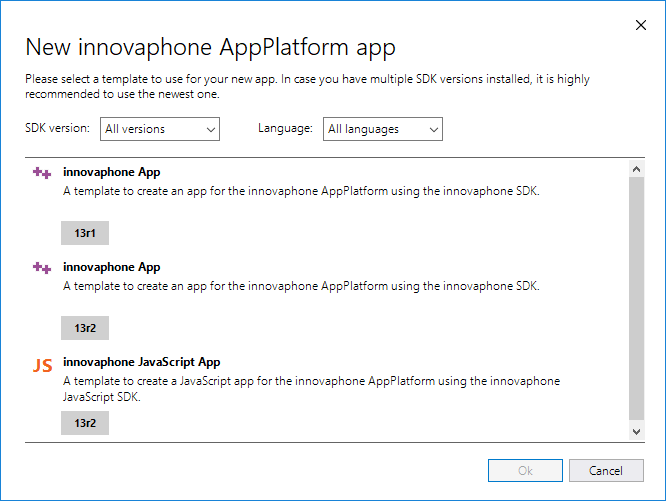
After that, you will see a dialog to select the kind of the app you want to create. Just choose one of the available templates to finally create the kind of app you want to develop. You can filter the
templates by the suported SDK version and / or the programming language to use. Please note that C++ means, that you're using C++ on the service part (the app running on the app platform), while JavaScript
will be used for the UI (the part visible in myApps). When choosing the JavaScript template, you have to use JavaScript for both, the service and the UI.
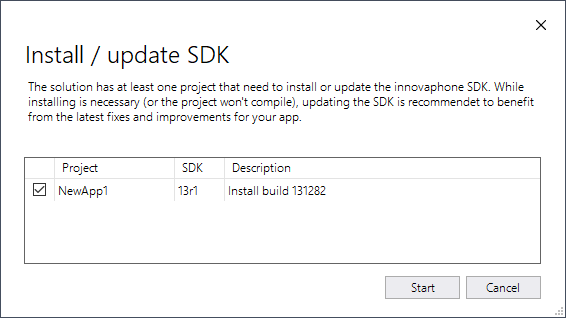
After the project has been created, you must install the SDK to the project. That means, that the SDK files will be copied to the source of the new created app. The innovaphone
SDK extension will do that for you, so just click on start. You can also cancel it, but your app won't compile (however, this also can be done later, see menu items). After the
files had been copied, your will be lead to the next step which is defining the connections you need to run.
Before creating your own app, you must at first understand, how an app for the innovaphone App Platform works. This is important to understand, how you need to setup the
connections in Visual Studio used during development.
An app generally has two parts: the UI, written with JavaScript/CSS/HTML, executed using a web browser or myApps, and the service which is written in C++. The C++ part will be
cross-compiled on your Windows development machine using gcc shipped with the innovaphone SDK. Compiling on other platforms like macOS or Linux is not supported
(even if the service itself will run on a Linux OS). However, a service must have at least one instance. The instance is finally that part the UI will connect to.
To run the app and make the UI available on myApps, the PBX and the App Platform must be configured for your app and the app itself must be deployed to the App Platform.
While this can be done manually, the innovaphone SDK extension helps out a lot managing that stuff. This is why you need to setup a bunch of "connections". There
are three types of connections:
- App Platform connection: This is the connection to the App Platform, technically a TCP connection to the App Platforms Linux OS.
- PBX connection: To use the app on myApps or with a web browser, an PBX object for your app must be created. For this, the PBX connection is needed which
is the IP address of the PBX that connects to the service / App Platform.
- Remote connection: This is the connection to the service, based on the App Platform connection. Actually this is the user / password for an App Platform connection
to login using SSH. This is why it is called remote connection..
The remote connection toghether with the App Platform connection is the information the innovaphone SDK extension needs to get access to the App Platform, configure the
service, add an instance, deploy the binary and access the service using SSH to be able to debug it from within Visul Studio. While the PBX connection is used to setup the
PBX app object, that is necessary for the UI to work and to let the PBX connect to your service via websocket. Please note that this also will enable the developer mode on
both, the PBX as well as the App Platform.
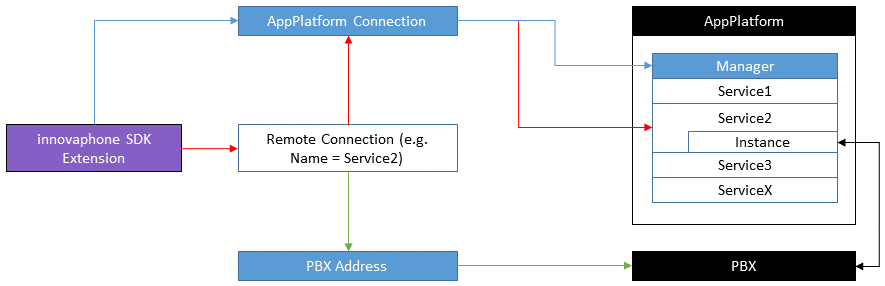
The following graph give you an overview. You can see, how the innovaphone SDK extension uses the App Platform connection communicates with the App Platform manager, while
using the remote connection together with the App Platform connection to deploy the application (the service, named "Service 2") and communicate with it for debugging purposes.
The extension also uses the remote connection (actually the name of the service) to setup the PBX (using the address for the PBX given while setting up the App Platform connection).
And finally the PBX itself will communicate with the instance of the service autonomous.
So the first of that connections your'll be asked about, is the remote connection. The name of this connection - which is the name of the service and because of this should always
be the same as the name of the project - will also be used to setup the database system. So if there is a connection with the same name as your project available, this connection
will be selected by default. If not, you need to create a new one (see below)
NOTE: Connections only be avlaiable for debug builds and depends on the selected platform (arm or x64). By default, a new project will have arm selected. If that isn't the
platform you're gonna use, just click cancel, switch to the desired platform and dialog to assign a new connection should be shown again. You also can open the dialog by clicking
on themenu Tools - innovaphone SDK - Assign remote connection...
If you have a remote connection created already (e. G. for another project), Visual Studio might use that one as default, which is wrong. In that case you have to open the
Assign remote connection dialog to assign an existing or create a new one.
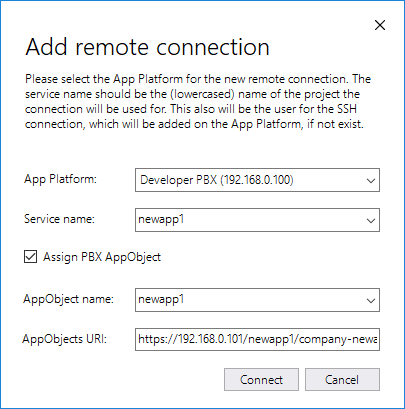
To add a new remote connection for your app, you must select the App Platform used for the app. If there is an already configured App Platform for the same platform type as
your app (arm, x64), that one will be selected automatically. If not, you must create a new App Platform connection by clicking on "New App Platform connection". (Look below to
learn about howto add a new App Platform connection). After adding a new App Platform connection, it will automatically be selected in the dialog.
After selecting the App Platform connection, or in case that the connection has been selected automatically, all services the App Platform knows will be placed it the combo box
"Service name". If there is a service combining with the name of your new app, that name will be selected automatically. If not, do not use an other service name. Generally the
service name (which finally will be the remote connection) must be the same as the name of your app. Note that some names are reserved. In that case, you will get an error message
and need to change the name of your project.
Also make sure that "Assign PBX AppObject" is selected. (If you can not select it, there is no PBX connection assigned with the App Platform connection). The available app objects
will be listed in the "AppObjct name" dropdown box and - you might guess it - if one of them combines with the name of your app, it will be selected. If not, enter a name (and yes,
again use the same as the name of your object). The AppObject URI will be entered automatically buy using the IP address of the App Platform and the name of your app. You can change
it, if you want by editing the app object in the PBX admin page.
NOTE: There are some names for your service aka project and the needed connection, that youre not allowed to use. In case you're using one of that names, the extension will
show an error message. You need to change the name of the project in Visual Studio to continue.
Adding a new App Platform connection is quite simple. Only a couple of data must be given. This is a unique name for the connection, the IP address of the App Platform and the password
(generally the administration password given during the installation of the pbx - is the same needed when accessing the app manager using a browser). Even if you can create such
a connection withouth a PBX connection, it generally is not a good idea. So also enter the IP address of PBX with the admin user name (generally admin, if not changed) and the password
(also set during installation).
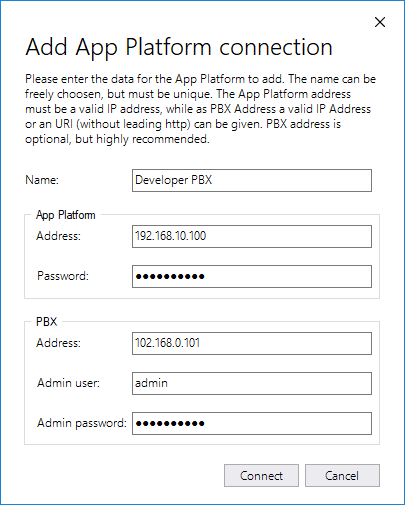
To finalize click on connect. The innovaphone SDK extension will now establish a connection to the App Platform and PBX, enable developer mode for both of them and save the App Platform
connection, which can now be used. In case of an error, you will get an message telling you why the connection could not be established.
IMPORTANT NOTE: The innovaphone SDK extension uses the Visual Studio Linux development layer to save and load the connection information. Because of this, that connections
are visible if you go to "Tools - Options - Crossplatform". But never ever delete or edit them there! This can break up the whole connection managment of the extension and
your app no longer can be deployed and debugged. If you want to delete connections (or add new ones), use the Connection Manager that is part of the innovaphone SDK extension (see below).
After setting up everything, you're ready to compile and debug your app. Just set a breakpoint and click on run (or press F5) to go. If everything is allright, Visual Studio will
compile the app, deploy the binary and start debugging it using GDB over SSH. More about debugging with Visual Studio can be found in the Visual Studio documentation.
Beside the debugging capatilities, here are some additional tipps:
Use logging:
The innovaphone SDK provides a interface to log messages from your app. This can be done by using the IInstanceLog class. This class is not only useful during development, also after
development a user can activate logging for your app. Beside this, all innovaphone SDK inferfaces using this logging system, helping you to find out what's going on. You can also use
debug->printf(), but this type of logging isn't instance dependend and thus only should be used during development. More more information, read the
debug documentation.
Use valgrind
Valgrind is a tool to find memory related problems in an app. While the drawback is, that your app will run very slow (up to 40% slower), but only during the debugging session using valgrind.
An other drawback is, that you need to run valgrind manually. You need to connect to the App Platform using a SSH terminal and use the user for your app to login. The user and password normaly
is the same as the name of your app, all in lower case. You also can use the innovaphone SDK menus to start a SSH terminal session (see below). When logged in, use the following commands to
start valgrind with your app (replacing "appname" with the name of your application):
chmod +x /apps/appname/appname
valgrind --leak-check=full --show-leak-kinds=all --error-exitcode=1 /apps/appname/appname
Valgrind now will start executing your app, catching all memory related operations. Doing this, it will find different kind of memory related errors: writing out of bound (even 1 byte),
accessing previously release memory (including object instances), not releasing memory, etc. This helps a lot to write clean progrems that takes care of a good memory management.
A sample of an error can look like this (this is a synthetic error log for demonstration reason, because releasing the debug object
is handled by the SDK):
        ==1506== HEAP SUMMARY:
        ==1506==     in use at exit: 20,601 bytes in 4 blocks
        ==1506==   total heap usage: 422 allocs, 418 frees, 174,870 bytes allocated
        ==1506==
        ==1506== 9 bytes in 1 blocks are still reachable in loss record 1 of 4
        ==1506==    at 0x4835474: malloc (vg_replace_malloc.c:299)
        ==1506==    by 0x4B2A8D3: strdup (in /lib/libc-2.22.so)
        ==1506==
        ==1506== 16 bytes in 1 blocks are still reachable in loss record 2 of 4
        ==1506==    at 0x4835C58: operator new(unsigned int) (vg_replace_malloc.c:328)
        ==1506==    by 0x2AF8B: IDebug::Create() (debug.cpp:371)
        ==1506==    by 0x2AFF3: __static_initialization_and_destruction_0(int, int) (debug.cpp:51)
        ==1506==    by 0x2B02B: _GLOBAL__sub_I_debug (debug.cpp:372)
        ==1506==    by 0x5961F: __libc_csu_init (in /mnt/sda2/apps/sysadmin)
        ==1506==
        ==1506== 352 bytes in 1 blocks are still reachable in loss record 3 of 4
        ==1506==    at 0x4835474: malloc (vg_replace_malloc.c:299)
        ==1506==    by 0x4B1021F: ??? (in /lib/libc-2.22.so)
        ==1506==    by 0x2A61F: Debug::OpenFile() (debug.cpp:208)
        ==1506==    by 0x2990B: Debug::Debug() (debug.cpp:69)
        ==1506==    by 0x2AF9B: IDebug::Create() (debug.cpp:371)
        ==1506==    by 0x2AFF3: __static_initialization_and_destruction_0(int, int) (debug.cpp:51)
        ==1506==    by 0x2B02B: _GLOBAL__sub_I_debug (debug.cpp:372)
        ==1506==    by 0x5961F: __libc_csu_init (in /mnt/sda2/apps/sysadmin)
        ==1506==
        ==1506== 20,224 bytes in 1 blocks are still reachable in loss record 4 of 4
        ==1506==    at 0x4835474: malloc (vg_replace_malloc.c:299)
        ==1506==    by 0x490EE2F: ??? (in /usr/lib/libstdc++.so.6.0.21)
        ==1506==
        ==1506== LEAK SUMMARY:
        ==1506==    definitely lost: 0 bytes in 0 blocks
        ==1506==    indirectly lost: 0 bytes in 0 blocks
        ==1506==      possibly lost: 0 bytes in 0 blocks
        ==1506==    still reachable: 20,601 bytes in 4 blocks
        ==1506==         suppressed: 0 bytes in 0 blocks
        ==1506==
        ==1506== For counts of detected and suppressed errors, rerun with: -v
        ==1506== ERROR SUMMARY: 0 errors from 0 contexts (suppressed: 0 from 0
For more information, look to the valgrind documentation.
Read the SDK documentation
The innovaphone SDK works in an asynchronously way. This maybe a form of programming you're not used to it, so it will be a good idea to read the documentation carefully to know which call
will lead to which callback, what to take care of, how to create instances of the interfaces, when to release them, etc. There are some examples that help you using the SDK.
Visit our forum
In our forum at http://forum.innovaphone.com/, there is an area for the SDK development. This will be the best place to talk
to other developers (including the ones from innovaphone), exchange ideas, solutions, knowhow and get support. We're looking forward to hear from you to and your experience with the innovaphone SDK.
The innovaphone SDK extension provides some menu items (Tools - innovaphone SDK) to help you during development of your app as well as managing the connections. There is also a toolbar (if the toolbar is not
visible, right click on the toolbar section and select innovaphone SDK). The meaning of the icons of the toolbar can be show by puting the mouse over them and wait for the tooltip
or by comparing them with the items in the innovaphone SDK menu:
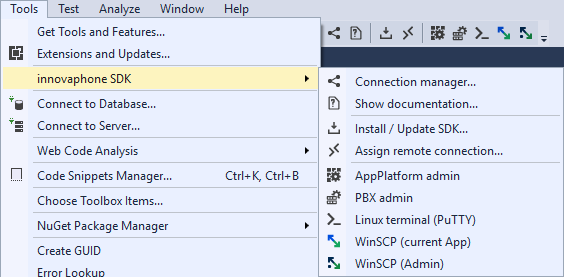
You can access the following functionality using the menu / toolbar:
- Connection manager: Here you can manage the connections used by the extension (see below).
- Show documentation: Will open the innovaphone SDK documentation.
- Install / Update SDK: Using this menu item will open the dialog to install or update the SDK into your project. This can also be used to reinstall the SDK if you accidentally delete some files of the SDK.
- Assign remote connection: This is to assign (which also means change) the remote connection used for the project.
- App Platform admin: This will open the App Platform manager where you can manage the available services and instances.
- PBX admin: This will open the PBX UI where you can manage the PBX which also includes the managment of the available PBX app objects, users, etc.
- Linux terminal: This will open PuTTY (or KiTTY) to give you access to a SSH terminal. This option will be grayed out if not SSH terminal application had been
defined buy the innovaphone SDK setup. You can run the setup again to define or change it (e. G. from PuTTY to KiTTY).
- WinSCP (current app): Will open WinSCP to connect to the App Platform. The user for the connection is the one for your app (the same as used by the remote connection). This
helps copying additional files to your apps directory, if need. With this, you only have access to your apps directory.
- WinSCP (Admin): Will open WinSCP to connect to the App Platform. The user for the connection is the admin user giving you access to nearly all files. Note that it is the
admin user of the App Platform and not the root user from the underlying Linux OS.
The innovaphone Connection Manager is the place where you can edit and add Remote Connections as well as App Platform Connections. You have two tabs The first one is "Remote Connection", where you
can remove and test connections as well as add new ones. The second one is "App Platform Connections". Beside removing, testing and addin new connections, you can also access the App Platform
manager of a selected connection as well as the PBX UI assigned to it. Not that whatever changed had been made, they only will be saved when closing the Connetion Manager by clicking on Accept.
If the Connection Manager will be closed by pressing ESC or clicking on the X of the windows, changes made will be discarded.
Q: I installed everything and started Visual Studio, but cannot find the innovaphone App template when creating a new project.
A: Somethimes Visual Studio needs to take its time. So close all Visual Studio instances and reopen it. Then the template should apear.
Q: How can I get the latest version of the SDK.
A: Run the innovaphone SDK setup to get the latest version. The next time you're opening an innophaone SDK project, the extension will check the version of the installed SDK and the available one and
in case that a newer had been detected, ask for updating the SDK in your project.
Q: The app won't compile because some files of the SDK cannot be found.
A: Reinstall the SDK by using the innovaphone SDK menu item.
Q: When updateing or installing the SDK, I got an error message that some files cannot be copied or deleted because they are accessed by an other process.
A: This happens sometimes. In that case, close ALL open Visual Studio instances, make sure that no other process has acces to the directory of files of your project, reopen Visual Studio, open
your project and try it again. Alternativly you can copy the files manually.
Q: I click on "Assign Remote Connection", but nothing happens.
A: Make sure that you have selected the debug profile. For release builds remote connections cannot be assigned.
Q: I want to backup the connection settings, how can I do that?
A: Well, the files are stored under %APPDATA%\innovaphone\VisualStudioPackage. Make a backup of the while VisualStudioPackage directory. But you also need to backup the connections managed
by the Visual Studio Linux development layer. This files can be found under %LOCALAPPDATA%\Microsoft\Linux\User Data\3.0\store.xml. When restoring, make sure that the directory structure
of the later is correct.
Q: Everything works, but it seems that there is not VisualStudioPackage directory under %APPDATA%\innovaphone.
A: Maybe that directory for the connection store had been changed. Look to the registry under HKEY_LOCAL_MACHINE\SOFTWARE\WOW6432Node\innovaphone\innovaphoneSDK, the key App PlatformStore. Be
careful to not edit the values in the registry until you're completly know what you're doing.
Q: I've accidentally deleted the connection info in the Visual Studio options unter cross platform. What can I do now?
A: Open the innovaphone SDK Connection Manager, delete every entry depending on the deleted Linux connection and create them again. Note that you also need to reasign that connection to
your project.
Q: The menu items or toolbar buttons for opening a Linux SSH terminal or using WinSCP are grayed out.
A: You must define the applications to use for them during the innovaphone SDK setup. Just run the setup again to change that settings.
Q: I've created a project an not assigned a remote connection. But according to the Visual Studio run button, there is an assigned connection but it doesn't work.
A: When not assigning a remote connection, Visual Studio will take the first connection available. But this won't work, so you need to assign it before you try to run and debug your app.
Q: When I try to run the app, it take a long time trying to upload the binary and finally I get an error message.
A: Make sure the App Platform is available. Also the Developermode must be enabled. To check this, open the App Platform Admin (using the innovaphone SDK menu in Visual Studio - the default apssword is pwd), go to Settings - General and check, if 'Enable developer mode' and 'Disable App security' are checked (note that 'Disable App security is only evailable, until 'Enable developer mode' has been enabled and the change had been saved).
Q: I run the app, but in myApps on my developer PBX, the app is not available.
A: Maybe the app is not connected to the PBX or not assinged to the PBX user you use for development. Open the PBX Admin (using the innovaphone SDK menu in Visual Studio), go to PBX - Objects and click on show. Click on the user you're using for development, select Apps and make sure, that the app you're want to use is selected. If not, click on OK (maybe you need to scrill down a little). Note: If you're opening the PBX Admin and there is the install UI, select on manuall configuration and click on continue.
Q: I've some problems or other questions regarding the innovaphone SDK or the Visual Studio extension, so where can I ask them?
A: Go to the innovaphone forum at http://forum.innovaphone.com - there is a forum for the SDK. Be welcome, we're glad to hear from you.
Q: Something goes wrong during the installation or I want to get rid of the SDK. What can I do?
A: Go to your system settings to the list of installed programs and run the uninstaller. If that won't work, you need to remove the files manually by performing the following steps (note that
an error during install can lead to an inconsistent installation with some files missing):
- Remove the registry-key by running regedit.exe and deleting the key HKEY_LOCAL_MACHINE\SOFTWARE\WOW6432Node\innovaphone\innovaphoneSDK.
- Delete the Visual Studio Extension (if already insatlled) from within the Visual Studio IDE. Go to "Tools - Extensions and Updates...", select the entry "innovaphone SDK" and click on uninstall.
- Delete all SDK files from the installation directory.
- Delete the program group from the start menu.
- Finally delete the environment variable INNOVAPHONE-SDK from your system.