Occasionally, JSON objects may exceed the constraints of json_io, making it impossible to fully decode them in a single operation. In such scenarios, chunked decoding can come in handy.
Chunked decoding is possible when a list, whether in the form of an array or an object, exists at some level of the JSON object, and each of its elements does not exceed the constraints.
In this tutorial, you will learn how to use the JSON library in an application.
The file and class names used in this example are based on a newly created app named NewApp1. Your file names may be different depending on your settings.
The complete source code is available on GitHub
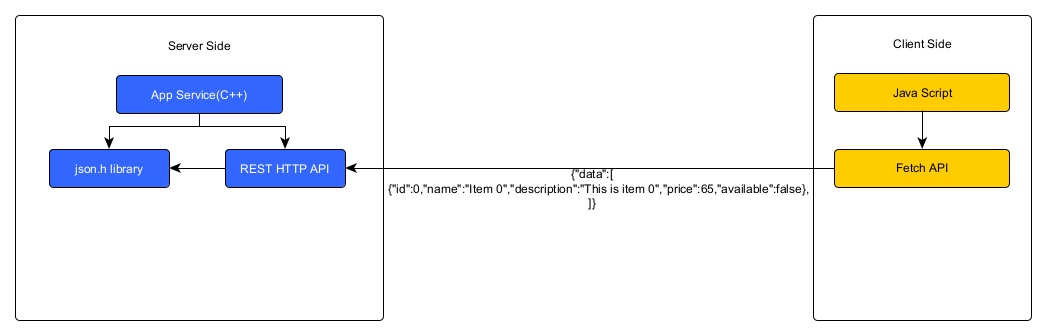
The idea is to create an application that sends a large JSON object from the client side using the Fetch API as a PUT request to the REST HTTP API implemented by the App Service.
Example JSON structure file, which will be used as a reference point throughout this tutorial.
Starting with the app template, we will open NewApp1/apps/inno-newapp1.js and remove all of the predefined functionality so that it looks like this.
var inno = inno || {};
inno.NewApp1 = inno.NewApp1 || function (start, args) {
    this.createNode("body");
    var that = this;

    var colorSchemes = {
        dark: {
            "--bg": "#191919",
            "--button": "#303030",
            "--text-standard": "#f2f5f6",
        },
        light: {
            "--bg": "white",
            "--button": "#e0e0e0",
            "--text-standard": "#4a4a49",
        }
    };
    var schemes = new innovaphone.ui1.CssVariables(colorSchemes, start.scheme);
    start.onschemechanged.attach(function () { schemes.activate(start.scheme) });

    var texts = new innovaphone.lib1.Languages(inno.NewApp1Texts, start.lang);
    start.onlangchanged.attach(function () { texts.activate(start.lang) });

    var app = new innovaphone.appwebsocket.Connection(start.url, start.name);
    app.checkBuild = true;
    app.onconnected = app_connected;

    function app_connected(domain, user, dn, appdomain) {

    }
}
In addition, you can remove the unnecessary code of the generated example in the files NewApp1/NewApp1.cpp and NewApp1/NewApp1_tasks.cpp.
Now back to JavaScript, we create a simple UI to be called inside app_connected(..), 1 button and an input field.
The inputfiled takes a JSON object for example this one and once the button is pressed
we use the fetch api to make a PUT Request the App Service which contains the inputfield data as body. After the PUT request you should get an error as response because we haven't implemented the REST API yet.
A simple implementation could look like this:
function app_connected(domain, user, dn, appdomain) {
    sendDiv = that.add(new innovaphone.ui1.Div("align-content:center; display:flex; justify-content:center;"));
    inputField = sendDiv.add(new innovaphone.ui1.Input("width:150px; height:25px; font-size:15px; margin-top:90px;", "", "Data", "", "text", "inputStyle"));

    sendButton = sendDiv.add(new innovaphone.ui1.Div("height:25px; padding-top:5px; padding-bottom:25px; margin-top:120px;", "Send", "button").addEvent("click", () => {
        // Make the PUT request
        fetch(start.originalUrl + '/json', {
            method: 'PUT',
            headers: {
                'Content-Type': 'application/json',
            },
            body: inputField.getValue()                       // The data inside inputfield is part of the body
        })
            .catch(error => {
                console.error('Error:', error);
            });
    }));
}
The button uses the pre-generated div.button CSS class, the width of the buttons is too large, to change that, remove these lines from NewApp1/apps/inno-newapp1.css
width:calc(100% - 20px);
left:10px;
To receive data from the Fetch API, we need to modify the ConfigInitComplete function in the NewApp1 class to listen on the path "/newapp1/json".
This can be done by adding the line "webserverPlugin->HttpListen("json", new class RestApi());" to the function, as shown below:
void NewApp1::ConfigInitComplete()
{
    delete currentTask;
    currentTask = nullptr;
    webserverPlugin->HttpListen(nullptr, nullptr, nullptr, nullptr, _BUILD_STRING_);
    webserverPlugin->HttpListen("json", new class RestApi());                           // added this line
    webserverPlugin->WebsocketListen();
    Log("App instance initialized");
}
The ResApi class that we added is not defined yet so:
class RestApi : public UWebserverPlugin {
public:
    RestApi();
    ~RestApi();
    void WebserverPluginHttpListenResult(IWebserverPlugin* plugin, ws_request_type_t requestType, char* resourceName, const char* registeredPathForRequest, ulong64 dataSize) override;
};
Next we implement the RestApi class that we created created inside NewApp1/NewApp1.cpp:
RestApi::RestApi()
{
}

RestApi::~RestApi()
{
}

void RestApi::WebserverPluginHttpListenResult(IWebserverPlugin* plugin, ws_request_type_t requestType, char* resourceName, const char* registeredPathForRequest, ulong64 dataSize)
{
    if (requestType == WS_REQUEST_PUT) {                // Wait for a PUT request
        plugin->Accept(new RestApiPut(this));           // Send the request to the PUT API class
    }
    else {
        plugin->Cancel(WSP_CANCEL_NOT_FOUND);
    }
}
The RestApiPut class that will be handeling the PUT requests, is not defined yet:
#define DATA_SIZE_MAX 256
class RestApiPut : public UWebserverPut {
public:
    RestApiPut(class RestApi* rest);
    ~RestApiPut();
    void WebserverPutRequestAcceptComplete(IWebserverPut* const webserverPut) override;
    void WebserverPutRecvResult(IWebserverPut* const webserverPut, void* buffer, size_t len) override;
    void WebserverPutRecvCanceled(IWebserverPut* const webserverPut, void* buffer) override;
    void WebserverPutSendResult(IWebserverPut* const webserverPut) override;
    void WebserverPutCloseComplete(IWebserverPut* const webserverPut) override;

    class RestApi* rest;
    char data[DATA_SIZE_MAX * 2 + 1];
    size_t fill;
    bool last;
};
Now we simply implement the defined RestApiPut class:
RestApiPut::RestApiPut(class RestApi* rest)
{
    this->rest = rest;
    this->fill = 0;
    this->last = false;
}

RestApiPut::~RestApiPut()
{
}

void RestApiPut::WebserverPutRequestAcceptComplete(IWebserverPut* const webserverPut)
{
    // start receiving data
    webserverPut->Recv(data, DATA_SIZE_MAX);                        // Recive 256 Byte of data
}

void  RestApiPut::WebserverPutRecvResult(IWebserverPut* const webserverPut, void* buffer, size_t len)
{
    if (!buffer || !len) {      //Check if this is the last chunk of data
        last = true;
    }
    if (len) {
        //...
    }
}

void  RestApiPut::WebserverPutRecvCanceled(IWebserverPut* const webserverPut, void* buffer)
{
}

void RestApiPut::WebserverPutSendResult(IWebserverPut* const webserverPut)
{
    // response is sent, close
    webserverPut->Close();
}

void RestApiPut::WebserverPutCloseComplete(IWebserverPut* const webserverPut)
{
    // clean-up
    delete webserverPut;
    delete this;
}
When using the JSON object from the beginning of the tutorial, the data is too large to be decoded all at once by the json.h library. It's limit, as mentioned earlier, is 64kB. So we split the data into bytes, in our case 256Byte. Since the data we split may not be complete,
we will use chunked decoding to decode the data and process it for each chunk.
An example of what 256 bytes of data from the sample JSON looks like:
            {"data":[
                {"id":0,"name":"Item 0","description":"This is item 0","price":65,"available":false,"tags":["tag1","tag2","tag3"]},
                {"id":1,"name":"Item 1","description":"This is item 1","price":65,"available":false,"tags":["tag1","tag2","tag3"]},
                {"id":2,"name":"I
Now we check if the array "a" is valid, we go through it using a for loop. If the current element of the loop is complete, we can process it. This goes on until the loop finds an incomplete element, at which point it exits. An element is marked as incomplete if the "json.get_object" is invalid. So the for loop in this case works like this:
if (a != JSON_ID_NONE) {
    word element = JSON_ID_NONE;
    for (element = json.get_object(a, 0); element != JSON_ID_NONE && !(json.get_flags(element) & JSON_FLAG_INCOMPLETE); element = json.get_object(a, element)) {
        // get object properties
        const char* name = json.get_string(element, "name");
        // process the data
        // ...
        debug.printf("Name:%s", name);
    }

}if (element != JSON_ID_NONE || flags & JSON_FLAG_INCOMPLETE) { // check if the end has been reached
char tmp[DATA_SIZE_MAX * 2 + 1]; // temporary buffer to save the incomplete data
char* x = tmp; // pointer to temporary buffer
debug->printf("Buffer before write: %s", tmp);
json.write(0, x, array); // saves element before incomplete data inside the array, the incomplete data and the terminating 0 to the tmp buffer
debug->printf("Buffer after write: %s", tmp);
fill = x - data; // calculate the length of the incomplete data by subtracting the 2 memory adresses, which is faster then strlen(tmp)
debug->printf("Fill size: %d", fill);
memcpy(data, tmp, fill + 1); // copy the incomplete data to the data buffer
}
// Check if there is remaining data from the inital request, which may or may not be JSON data
if (!last) {
// append next chunk to the end of the incomplete data
webserverPut->Recv(&data[fill], DATA_SIZE_MAX);
}
else {
// send 202 OK response with no content data
webserverPut->SetResultCode(WEBDAV_RESULT_OK, 0);
webserverPut->Send(0, 0);
}
{"data":[{"id":1,"name":"Item 1","description":"This is item 1","price":65,"available":false,"tags":["tag1","tag2","tag3"]},{"id":2,"name":"IThe complete code of the WebserverPutRecvResult function would look like the following:
void  RestApiPut::WebserverPutRecvResult(IWebserverPut* const webserverPut, void* buffer, size_t len)
{

    if (!buffer || !len) {                  //Check if this is the last chunk of data
        last = true;
    }
    if (len) {
        // decode
        data[fill + len] = 0;           // Write the terminating 0 after the incomplete data length + the new data
        class json_io json(data);
        json.decode();
        word root = json.get_object(JSON_ID_ROOT, 0);
        // get array of objects
        word array = json.get_array(root, "data");
        if (array != JSON_ID_NONE) {
            word element = JSON_ID_NONE;
            for (element = json.get_object(a, 0); element != JSON_ID_NONE && !(json.get_flags(element) & JSON_FLAG_INCOMPLETE); element = json.get_object(a, element)) {
                // get object properties
                const char* name = json.get_string(element, "name");
                // process the data
                // ...
                debug->printf("%s", name);


            }
            if (element != JSON_ID_NONE || flags & JSON_FLAG_INCOMPLETE) {              // check if the end has been reached
                char tmp[DATA_SIZE_MAX * 2 + 1];                                        // temporary buffer to save the incomplete data
                char* x = tmp;                                                          // pointer to temporary buffer
                debug->printf("Buffer before write: %s", tmp);
                json.write(0, x, array);                                                // saves element before incomplete data inside the array, the incomplete data and the terminating 0 to the tmp buffer
                debug->printf("Buffer after write: %s", tmp);
                fill = x - data;                                                        // calculate the length of the incomplete data by subtracting the 2 memory adresses, which is faster then strlen(tmp)
                debug->printf("Fill size: %d", fill);
                memcpy(data, tmp, fill + 1);                                            // copy the incomplete data to the data buffer
            }
            else
                fill = 0;                                                               // Because the end of the JSON has been reached we start reciving date from the start
        }
    }
    // Check if there is remaining data from the inital request, which may not be JSON data
    if (!last) {
        // append next chunk to the end of the buffer which contains the incomplete data
        webserverPut->Recv(&data[fill], DATA_SIZE_MAX);
    }
    else {
        // send 202 OK response with no content data
        webserverPut->SetResultCode(WEBDAV_RESULT_OK, 0);
        webserverPut->Send(0, 0);
    }
}
In conclusion, this tutorial provided a detailed guide on how to use the JSON library to decode large JSON objects using chunked decoding.
We learned how to create a small application with a button and an input field to send and receive data through REST API from the client to the App Service.
Finally, we learned the steps involved in chunked decoding, including how to find the list within the decoded data and how to encode incomplete data using the write function.
By following the steps outlined in this tutorial, developers can successfully handle and transfer large JSON objects using chunked encoding and decoding in their applications.